许多类在使用配置对象创建(实例化)类时,都有快捷名称。快捷名称被称为 alias(或 xtype,如果该类扩展了 Ext.Component)。对于适用的类,别名/xtype 列在类名旁边,以供快速参考。
框架类或其成员可以指定为 private 或 protected。否则,该类/成员为 public。Public、protected 和 private 是访问描述符,用于传达应如何以及何时使用类或类成员。
Public 类和类成员可供任何其他类或应用程序代码使用,并且在主要产品版本中可以作为稳定和持久的内容依赖。公共类和成员可以通过子类安全地扩展。
Protected 类成员是稳定的 public 成员,旨在由拥有类或其子类使用。受保护的成员可以通过子类安全地扩展。
Private 类和类成员在框架内部使用,不 предназначен для использования разработчиками приложений. 私有类和成员可能会在没有任何通知的情况下随时更改或从框架中删除,并且不应在应用程序逻辑中依赖它们。
static 标签。*请参阅下面的静态。下面是一个示例类成员,我们可以对其进行剖析,以展示类成员的语法(在本例中为从 Ext.button.Button 类查看的 lookupComponent 方法)。
让我们看一下成员行的每个部分
lookupComponent)( item ))Ext.Component)。对于不返回除 undefined 之外的任何内容的方法,可能会省略此项,或者可能会显示为由正斜杠 / 分隔的多个可能值,表示返回的内容可能取决于方法调用的结果(即,如果 get 方法调用成功,则方法可能会返回一个 Component,如果失败,则返回 false,这将显示为 Ext.Component/Boolean)。PROTECTED - 请参阅下面的标志部分)Ext.container.Container)。如果成员源自当前类,则源类将显示为蓝色链接;如果它从祖先类或混入类继承,则显示为灰色。view source)item : Object)。undefined 之外的值,“返回值”部分将注释返回的类或对象的类型以及描述(示例中为 Ext.Component)Available since 3.4.0 - 示例中未显示),紧接在成员描述之后Defaults to: false)API 文档使用许多标志来进一步传达类成员的功能和意图。标签可以用文本标签、缩写或图标表示。
classInstance.method1().method2().etc();false,则标记为可阻止的事件将不会触发- 表示框架类
- 单例框架类。*有关更多信息,请参阅单例标志
- 组件类型框架类(Ext JS 框架中扩展 Ext.Component 的任何类)
- 表示类、成员或指南在当前查看的版本中是新的
- 表示类型为 config 的类成员
- 表示类型为 property 的类成员
- 表示类型为 method 的类成员
- 表示类型为 event 的类成员
- 表示类型为 theme variable 的类成员
- 表示类型为 theme mixin 的类成员
- 表示类、成员或指南在当前查看的版本中是新的
在 API 文档页面上的类名正下方是一行按钮,对应于当前类拥有的成员类型。每个按钮都显示按类型划分的成员计数(此计数会在应用过滤器时更新)。单击按钮会将您导航到该成员部分。将鼠标悬停在成员类型按钮上将显示该类型的所有成员的弹出菜单,以便快速导航。
与类 config 选项相关的 Getter 和 Setter 方法将显示在方法部分以及 API 文档和成员类型菜单的 configs 部分中,就在它们所作用的 config 下方。Getter 和 Setter 方法文档将在 config 行中找到,以便于参考。
您的页面历史记录保存在本地存储中,并显示在顶部标题栏下方(使用可用的实际空间)。默认情况下,显示的唯一搜索结果是与您当前查看的产品/版本匹配的页面。您可以通过单击历史记录栏右侧的 按钮并选择“全部”单选按钮来展开显示的内容。这将显示所有产品/版本的所有最近页面历史记录栏。
在历史记录配置菜单中,您还将看到最近页面访问的列表。结果按“当前产品/版本”和“全部”单选按钮过滤。单击 按钮将清除历史记录栏以及本地存储中保存的历史记录。
如果在历史记录配置菜单中选择“全部”,则将启用“在历史记录栏中显示产品详细信息”复选框选项。选中后,每个历史页面的产品/版本将与历史记录栏中的页面名称一起显示。将光标悬停在历史记录栏中的页面名称上也会将产品/版本显示为工具提示。
可以使用页面顶部的搜索字段搜索 API 文档和指南。
在 API 文档页面上,还有一个过滤器输入字段,用于使用过滤器字符串过滤成员行。除了按字符串过滤外,您还可以按访问级别、继承和只读过滤类成员。这是通过使用页面顶部的复选框完成的。
API 类导航树底部的复选框过滤类列表以包括或排除私有类。
单击空的搜索字段将显示您最近 10 次搜索,以便快速导航。
每个 API 文档页面(JavaScript 原始类型页面除外)都有一个与该类相关的元数据菜单视图。此元数据视图将具有以下一项或多项
Ext.button.Button 类具有 Ext.Button 的备用类名)。备用类名通常为了向后兼容性而维护。可运行的示例 (Fiddles) 默认在页面上展开。您可以使用代码块左上角的箭头单独折叠和展开示例代码块。您还可以使用页面右上角的切换按钮切换所有示例的折叠状态。切换所有状态将在页面加载之间记住。
类成员默认在页面上折叠。您可以使用成员行左侧的箭头图标或右上角的展开/折叠全部切换按钮全局展开和折叠成员。
在较窄的屏幕或浏览器上查看文档将导致针对较小外形尺寸优化的视图。桌面视图和“移动”视图之间的主要区别在于
可以通过单击 API 文档页面顶部的类名来查看类源代码。可以通过单击成员行右侧的“查看源代码”链接来查看类成员的源代码。
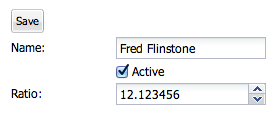
将数据映射到编辑器图。
本指南涵盖了一个基本编辑器示例。

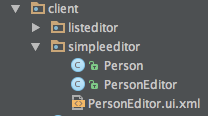
在此示例中,文件如下所示

示例中使用的对象图。
public class Person {
  private long id;
  private String name;
  private boolean active;
  private double ratio;
  public Person() {
  }
  public void setId(long id) {
    this.id = id;
  }
  public long getId() {
    return id;
  }
  public void setName(String name) {
    this.name = name;
  }
  public String getName() {
    return name;
  }
  public boolean isActive() {
    return active;
  }
  public void setActive(boolean active) {
    this.active = active;
  }
  public double getRatio() {
    return ratio;
  }
  public void setRatio(double ratio) {
    this.ratio = ratio;
  }
  @Override
  public String toString() {
    String s = "{ Person: ";
    s += "name=" + name + " ";
    s += "active=" + active + " ";
    s += "ratio=" + ratio;
    s += " }";
    return s;
  }
}
PersonEditor.ui.xml UiBinder
<!-- PersonEditor.ui.xml file -->
<!DOCTYPE ui:UiBinder SYSTEM "http://dl.google.com/gwt/DTD/xhtml.ent">
<ui:UiBinder
        xmlns:ui="urn:ui:com.google.gwt.uibinder"
        xmlns:container="urn:import:com.sencha.gxt.widget.core.client.container"
        xmlns:form="urn:import:com.sencha.gxt.widget.core.client.form"
        xmlns:button="urn:import:com.sencha.gxt.widget.core.client.button">
    <ui:style>
        .widget {
            margin: 30px;
        }
    </ui:style>

    <container:FlowLayoutContainer ui:field="container" width="300" addStyleNames="{style.widget}">
        <container:child>
            <button:TextButton text="Save" ui:field="save" />
        </container:child>
        <container:child>
            <form:FieldLabel text="Name">
                <form:widget>
                    <form:TextField ui:field="name" />
                </form:widget>
            </form:FieldLabel>
        </container:child>
        <container:child>
            <form:FieldLabel text="" labelSeparator="">
                <form:widget>
                    <form:CheckBox ui:field="active" boxLabel="Active" enabled="true" />
                </form:widget>
            </form:FieldLabel>
        </container:child>
        <container:child>
            <form:FieldLabel text="Ratio">
                <form:widget>
                    <form:DoubleSpinnerField ui:field="ratio" />
                </form:widget>
            </form:FieldLabel>
        </container:child>
    </container:FlowLayoutContainer>
</ui:UiBinder>
PersonEditor 连接编辑器以编辑 Person
import com.google.gwt.core.client.GWT;
import com.google.gwt.editor.client.Editor;
import com.google.gwt.editor.client.SimpleBeanEditorDriver;
import com.google.gwt.uibinder.client.UiBinder;
import com.google.gwt.uibinder.client.UiField;
import com.google.gwt.uibinder.client.UiHandler;
import com.google.gwt.user.client.ui.IsWidget;
import com.google.gwt.user.client.ui.Widget;
import com.sencha.gxt.widget.core.client.event.SelectEvent;
import com.sencha.gxt.widget.core.client.form.CheckBox;
import com.sencha.gxt.widget.core.client.form.DoubleSpinnerField;
import com.sencha.gxt.widget.core.client.form.TextField;

public class PersonEditor implements IsWidget, Editor<Person> {
  // Editor driver
  private static final PersonDriver driver = GWT.create(PersonDriver.class);

  interface PersonDriver extends SimpleBeanEditorDriver<Person, PersonEditor> {
  }

  // UiBinder and fields
  private static final PersonEditorUiBinder uiBinder = GWT.create(PersonEditorUiBinder.class);

  interface PersonEditorUiBinder extends UiBinder<Widget, PersonEditor> {
  }

  @UiField
  TextField name;
  @UiField
  CheckBox active;
  // Note: before GXT 3.0.4 SpinnerField<N> was used.
  @UiField
  DoubleSpinnerField ratio;

  private Widget widget;

  @Override
  public Widget asWidget() {
    if (widget == null) {
      widget = uiBinder.createAndBindUi(this);

      // Initialize the editor driver
      driver.initialize(this);
    }

    return widget;
  }

  // Fill in the editors fields with the person properties
  public void edit(Person person) {
    driver.edit(person);
  }

  // When save is clicked
  @UiHandler("save")
  public void onSaveSelect(SelectEvent event) {
    Person person = driver.flush();
    System.out.println(person);

    // When save is clicked:
    // { Person: name=Fred Flinstone active=true ratio=12.123456 }
  }
}
使用 PersonEditor 编辑人员
public void onModuleLoad() {
  Person person = new Person();
  person.setId(1);
  person.setName("Fred Flinstone");
  person.setActive(true);
  person.setRatio(12.123456);

  PersonEditor personEditor = new PersonEditor();
  RootPanel.get().add(personEditor);

  personEditor.edit(person);
}